If you got here, it's that you've decided to explore vaping a little deeper. You'll want to make your own coils of electronic cigarettes to control every aspect of your vape.
The rebuildable atomizer world is fascinating as it allows you to customize numerous settings to get a vape that meets your needs.
Of course, starting in the rebuildable can seem to be complicated at first sight but rest assured, it's an easy process once you've mastered the different steps.
With this guide, we'll take you through all the creation steps of an atomizer coil and all the equipment you'll need to set yourself to work.
The necessary equipment
Before rolling up your sleeves to make your first coil, you'll need:
- A reel of coil wire
- Fiber cotton
- A coil jig
- A measuring tool (ohmmeter or an electronic mod)
- An Allen wrench or a flat or cross-shaped screwdriver according to the atomizer
- Wire cutters
- Scissors
You can find all the equipment necessary for the making of your coils in our consumables and tools categories.
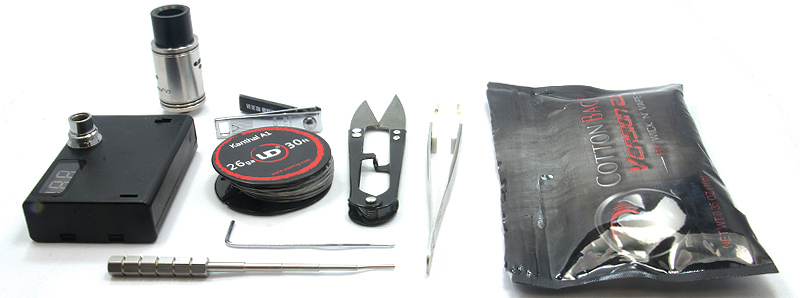
The necessary equipment to make your coil
The steps to make your coil
The making of a coil for rebuildable atomizers is divided into different steps:
- Coil making
- Installation of the coil on the deck
- Coil setting up
- Installation of the cotton
- Coil priming
Coil making
- Cut a wire piece long enough to easily handle it (a few centimeters are enough)
- Make the number of spirals desired on your coil jig. Try to keep the wire taut to get similar spirals.
- Taut the two ends of your coil to facilitate the installation of the deck.
N.B: To help you, you can use an app meant for coil calculations like the one available on vapez.fr. Enter your type and wire section, the diameter of your axis, the number of coils, and the number of spirals to determine the theoretical value of your build.
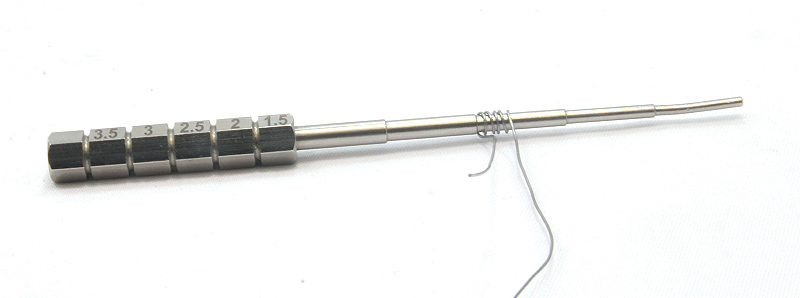
Coil making with a coil jig
Installation of the coil on the deck
- Insert the ends of your coil into the connection posts of your atomizer
- While maintaining the coil in its final position, block it with screws
- Cut the wire excess that goes over connection posts to avoid short-circuits
N.B: For atomizers with a postless deck, use the coil jig included in your atomizer box to have ends of the right length. You won't have any excess to cut with this type of deck.
Installation of your coil in the deck posts
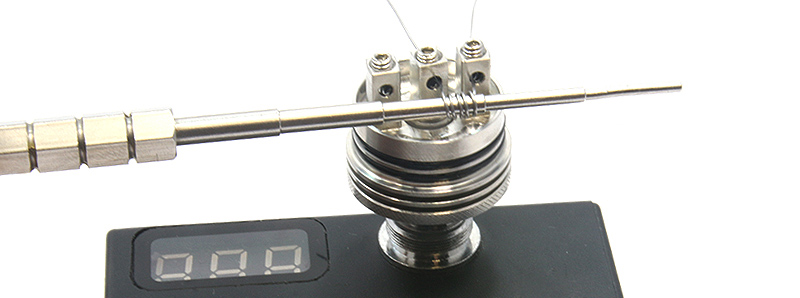
Coil setting up
This step aims to stabilize the coil and get uniform heating which avoids dry hits.
- Once the coil is correctly installed on your deck with an ohmmeter or an electronic mod, give small impulses to heat the coil
- Don't entirely redden the coil
- With ceramic pliers, slightly scratch the coil by focusing on small hot spots to make them disappear
- A correctly set up coil will have uniform heating from the center to the ends without hot spots
N.B.: For dual coil atomizers (or more), you'll have to make this step on both coils while ensuring the heat is perfectly synchronized. The two coils have to redden in the same way to be fully efficient.
The coil with checking on an ohmmeter
Installation of the cotton
- Cut a small piece of cotton
- Work your cotton as you wish
- Insert your cotton into the coil
- Cut the cotton excess. The length will depend on the atomizer. The cotton has to be long enough to reach the tank.
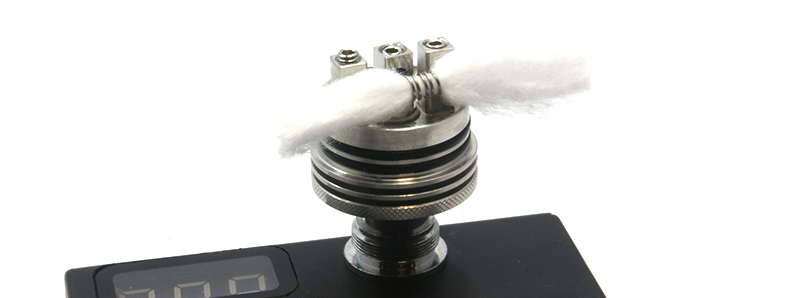
Placement of the fiber in the coil
Coil priming
In the same way as a clearomizer, it is important to prime the coil by putting some drops of e-liquid on the cotton before putting the atomizer back up.
Take this moment to check that everything works perfectly.
As soon as the cotton is correctly soaked, you can trigger some impulses to see if the e-liquid correctly evaporates. The vaporization has to be homogenous, you'll probably have to change the cotton if there are too many e-liquid splashes.
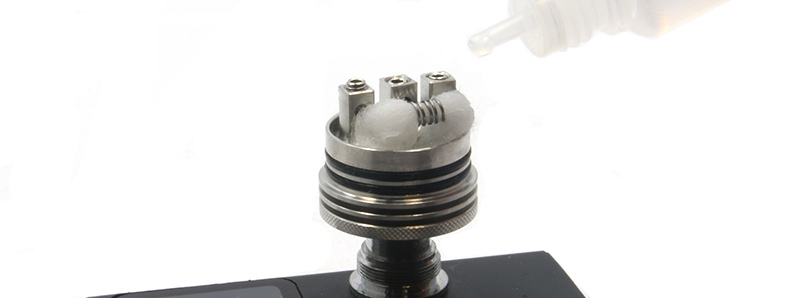
The coil soaked with e-liquid
Your atomizer is ready!
Once you've finished these steps and made sure there's no problem, your coil and your atomizer is ready to be used. Congratulations!
Q&A - Questions on rebuildable
Is rebuilding your coil difficult?
Anyone can make their own coils for their rebuildable atomizer. At first, the operation may seem a little complicated, but with patience and a little practice, you'll soon obtain perfect coils.
Don't be discouraged, just try again. You'll get the hang of it, and discover the satisfaction that comes with rebuilding, not to mention the flavor rendering!
My atomizer is leaking
A very common symptom when making your first coils, leaks are most often due to insufficient or incorrectly positioned cotton. You'll have to remake the coils, taking care to add a little more.
I've got liquid coming up through the drip tip
As with leaks from air intakes (airflow), you may notice small amounts of e-liquid rising up through the drip tip, also known as "glugging".
The causes are similar: a lack of cotton or a single-coil build in an atomizer designed for two coils.
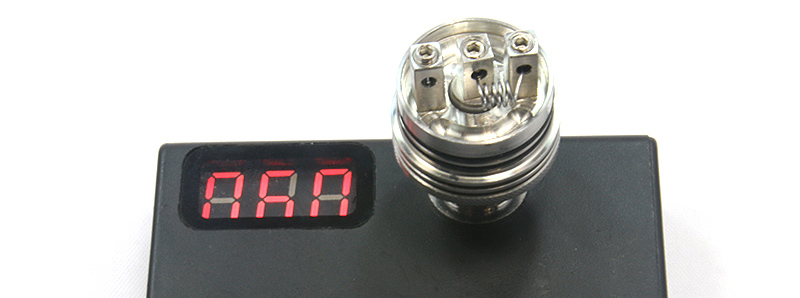
Why does my coil value vary?
The coil is badly tightened
It is important to check that your build correctly functions before vaping. To do that, we use an ohmmeter or an electronic mod with a screen capable of displaying the tension or coil value.
If the coil is too tight, you might see the message 'Atomizer Short' or a hot spot at the end of your coil. The wire can expand white heating, you might need to tighten the coil of a quarter turn on the posts.
The coil is badly fitted
Some rebuildable atomizers have a narrow build deck, and the bell (atomizing chamber) may come into contact with your coil when it is put back into its housing.
The contact between the coil and the bell creates a small short circuit, and you'll see the value of the coil vary with totally random values.
There are two solutions:
- Cut the legs of your coil shorter to avoid contact with the bell
- Move the coils closer to the connectors to avoid a short circuit
The connection between the mod and the atomizer is faulty
Over time, the connection posts on your mod or atomizer can become slightly oxidized. This can lead to a faulty connector, preventing you from vaping properly.
To remedy this, you can clean the connection posts with a small brush or white vinegar and a dry cloth. If the connection posts are adjustable, you can also try adjusting them by screwing or unscrewing them slightly.
Caution: Never fit an unstable coil to a mechanical mod without a safety device. Make sure you have solved the problem before use, otherwise you risk triggering a short-circuit that could cause the battery to outgas.
Why do I get a burnt taste (dry hits)?
Did you make your coil and vaped it on your rebuildable atomizer, but surprise, you've made a burnt taste called 'dry-hit'? Two reasons for this problem:
- Your coil is unstable and has a hot spot on your coil that burns the cotton
- You didn't dose the cotton capacity correctly
In case you have an unstable coil, we invite you to make the verifications offered in the previous part.
Regarding the cotton, the fiber dosage is a crucial step when you make your builds. If you have a disagreeable taste while vaping, it's probably because of a misplacement or a wrong dosage of your cotton:
- Too much cotton or too tightly packed a fiber will prevent the e-liquid from circulating and powering the coil. As you vape, the fiber will dry out and eventually burn. That's the definition of a dry hit!
- If you don't use enough cotton, you'll end up with airflow leaks, liquid coming back up through the drip tip, or a "hot" taste, as the coil won't be able to vaporize the excess liquid.
When do you rebuild your coil?
In the same way, as with a clearomizer, you change the coil when the taste and/or vape seem altered.
However, with the atomizer, you can change only the cotton! An operation that only takes a few seconds, but has its limits. As soon as the coil is degraded and starts to blacken, you need to rebuild the entire coil.
We recommend that you rebuild your coil regularly, once a week for example, to ensure the healthiest possible use of your electronic cigarette.
This frequency may vary according to the e-liquid used, whether it is more or less sweetened, and its vegetable glycerin content.